
There are a lot of tutorials out there, that tell you how to install ldap and set up its configuration. Since version 2.3 OpenLDAP has changed to a dynamic runtime configuration, also called OLC (OpenLDAP Configuration or On-Line Configuration) but tutorials barely exist. This tutorial should help you set up your OpenLDAP with this dynamic configuration, secure your LDAP server with SSL, install some goody modules, create the first LDAP database and help you with a wonderful tool to either help managing your LDAP server but also your databases. LDAP made easy… kinda.
Installation
Ok, easy start with the installation. Run the following command:
> apt-get install slapd ldap-utils
This will install openldap and the ldap utilities on your server.
Accessing cn=config
Installation is done, time for the configuration part. The LDAP server stores its configuration in a DIT style database, with its root cn=config. To access the DIT, you need to bind to the configuration. In order to do that it is necessary to create a root DN and password. First check if there already is a olcRootDN. Running the following command:
> ldapsearch -Y EXTERNAL -H ldapi:/// -b cn=config
This will output a lot to your terminal. At the end there is the database configuration. Look for the # {0}config, config database and check if there is olcRootDN present. If so, you may use that one, or change it. First create a password for the root:
> slappasswd
Enter your password twice and you get the password hash. Next is creating a ldif file to create the olcRootDN and its password in the configuration database, I named it config.ldif:
# uncomment this part, if there is no olcRootDN present
# use replace instead of add, if you want to change the root dn
#dn: olcDatabase={0}config,cn=config
#changetype: modify
#add: olcRootDN
#olcRootDN: cn=admin,cn=config

dn: olcDatabase={0}config,cn=config
changetype: modify
add: olcRootPW
olcRootPW: secret
Remember to replace secret with your created password above. Add them to your LDAP server with the following command:
> ldapadd -Y EXTERNAL -H ldapi:/// -f config.ldif
And test your binding with your root DN:
> ldapsearch -b cn=config -D cn=admin,cn=config -W
this will ask for your freshly created password. Enter it and you will see the same result as above. That’s it, now the LDAP server and configuration is accessible. Time to fill it with some content.
Managing the LDAP configuration
Managing the LDAP configuration via command line is a pain. Luckily there is a wonderful tool available, that helps you with that and even gives you auto-completion for all the available schemas. It’s called Apache Directory Studio and runs on Mac, Linux and Windows. I will use APD now, to continue with the configuration as it is much more comfortable (Screens show the german version).
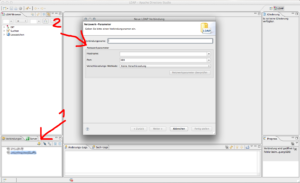
(1) Click to create a new connection, which brings up the new connection wizard (2). Give it a descriptional name, enter the hostname. For now, leave port 389, and normal ldap encrytpion we will secure it in a second. Hit the check connection button. A popup will hopefully tell you, the connection works. Click next.
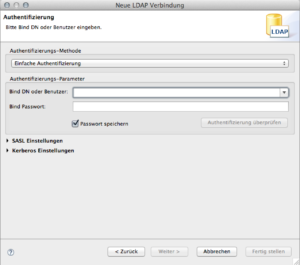
Enter the Bind DN which is cn=admin,cn=config, the bind password from above and click check authentication. The friendly popup will tell you, it works. Click next.
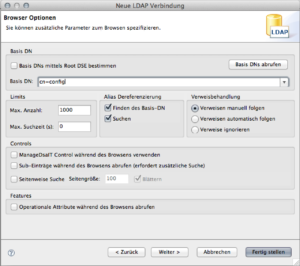
Uncheck the upper left checkbox and enter the Base DN (since we know it, we don’t need APD to find it for us). Enter cn=config as Base DN. Click finish; a connection will automatically established and will be opened in the LDAP browser.
Securing OpenLDAP with SSL
To secure the LDAP connection over SSL, add the CAcertificate, the servercert and the serverkey to the configuration. In the freshly opened connection, click the cn=config tree node in the the LDAP Browser. You can see the existing attributes on the selected entry in the middle view of APD. (1) In the toolbar of that view you can add new attributes and the best is auto-completion. The attributes to add for SSL are: olcTLSCertificateFile, olcTLSCertificateKeyFile, olcTLSCACertificateFile.

After adding these attributes, there’s one more to add to /etc/default/slapd. Change the SLAPD_SERVICES and change to the ldaps:/// protocol. Mine looks like:
SLAPD_SERVICES="ldaps:/// ldapi:///"
Now restart slapd:
> /etc/init.d/slapd restart
To test this, you can run nmap port scan or try to reconnect to your server in APD, which should refuse to connect. Now, edit your connection in APD, change the port to 636 and select ldaps:// as encryption.
P.S. In case you don’t want to expose your LDAP server that short time without beeing secured via SSL, you can of course write an ldif file with the three attributes and add them the same way as config.ldif.
Creating a LDAP Database
Finally, create a LDAP database.
- Create a new entry by right-clicking on cn=config in APD, select new > new entry… and click next. Time to consider which database backend should be used. OpenLDAP ships with HDB, that’s going to be used. That means the objectClass to use is olcHdbConfig.
- Next is the RDN which is olcDatabase as key and the value must be the type of the database, hdb.
- Clicking next and give the required attribute olcDbDirectory a value. olcDbDirectory maps to a physical path on your server, where the contents for the LDAP database are stored. The folder must have openldap as user and group ownership.
- There is another mandatory parameter which is olcSuffix. Add this, to give your database a DIB (Directory Information Base, like dc=example,dc=com). It isn’t shown as a must parameter, Howard Chu explains: „This is just an artifact of slapd.conf support. Since slapd.conf files aren’t affected by the olc objectclass definitions, we need to put the enforcement in the common code instead of in the schema.“.
See Also: Add/Delete Databases on LDAP for Rocket Scientists
Database is created, now it’s time to add olcRootDN and olcRootPW, olcAccess rules for your database and olcDbIndex to improve performance. Here is an idea for an index:
index   objectClass             eq
index   cn                      pres,sub,eq
index   sn                      pres,sub,eq
index   uid                     pres,sub,eq
index   displayName             pres,sub,eq
index   default                 sub
index   uidNumber               eq
index   gidNumber               eq
index   mail,givenName          eq,subinitial
index   dc                      eq
From: LDAP/OpenLDAP Setup (Debian Wiki)
Enable memberOf
Installation
When working with groups and you want to filter for users with a specific membership. This is done with the ‚virtual‘ attribute memberOf. This functionality is not enabled by default and must be installed as a module. The installation is been done with one attribute. Browse to cn=module,cn=config in APD and add a new attribute olcModuleLoad. Give it the memberof value. It will change to {n}memberof where n is a numeric value. That’s fine, that’s how OpenLDAP manages multiple values. There will be {0}back_hdb and memberof will become {1}memberof, so two modules will be installed by then.
See Also: Add/Delete Modules on LDAP for Rocket Scientists
Usage
In order to enable the virtual attribute memberOf for a database create an overlay. Right click the database in the APD LDAP Browser > new > new entry… and click next. The objectClass is olcMemberOf (you may need to click the refresh button next to the search field). The RDN is olcOverlay and the value is memberof. Add the following values:
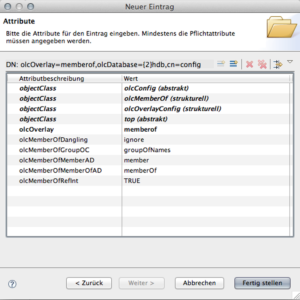
You should adjust the attributes olcMemberOfGroupOC, olcMemberOfMemberAD and olcMemberOfMemberOfAD to match your setup.
Remember: As memberOf is a virtual attribute and you probably restore your ldap database from an existing directory, the memberOf value won’t be available. This value will only be available when a certain record is created (and as such the virtual value will be created accordingly).
References
General
- OpenLDAP
- LDAP for Rocket Scientists
- LDAP @ Debian Wiki
- LDAP (German)
- LDAPguru
- LDAP Schema Design
- More on links gossi @ delicious with „ldap“